
Setting up a dual boot means installing Linux next to Windows on the same PC, so a menu at startup lets you pick either one. This guide is the hands-on procedure. If you’re still deciding whether dual booting is right for you, not sure? read this first: what is a dual boot?
The worked example is Windows 11 + Ubuntu LTS (26.04 or 24.04), the most common pairing. The same order of operations works for other mainstream distros like Linux Mint and Fedora; where their installers word things differently, we describe the option by what it does.
Quick answer: how to set up dual boot (Windows 11 + Ubuntu)
- Back up your files and create a Windows recovery drive.
- Save your BitLocker/Device Encryption recovery key, then turn encryption off for the install.
- Confirm the PC uses UEFI and a GPT disk, and disable Fast Startup.
- Shrink the Windows partition in Disk Management; leave 60–100 GB unallocated.
- Download the Ubuntu ISO from ubuntu.com and verify its SHA256 checksum.
- Write it to a USB stick with Rufus (GPT/UEFI) or balenaEtcher.
- Boot the USB’s UEFI entry from your PC’s boot menu, and test hardware in the live session.
- In the installer, choose the option to install Ubuntu alongside Windows Boot Manager.
- Leave Secure Boot on; enroll a MOK key only if the screen appears.
- Make Ubuntu first in the boot order, install updates, and fix the clock difference.
Before you start
What you need
- A USB flash drive of 8 GB or more for the Linux installer (Canonical recommends 12 GB+ for current Ubuntu images; a 16 GB stick avoids any doubt). It will be erased.
- A second USB drive for the Windows recovery drive (Microsoft’s tool asks for at least 16 GB).
- A completed backup of everything you can’t afford to lose (see the safety order below).
- Free disk space for Linux: plan on 60–100 GB. Canonical’s minimum is 25 GB, but that’s for the system alone. Updates, old kernels kept as fallbacks, Snap and Flatpak apps, a swap file, and your own files add up quickly.
- A power supply plugged in for laptops; don’t let the battery die mid-install.
- Time: about 1.5–3 hours total. The install itself takes 15–30 minutes; backups and turning off BitLocker (which decrypts the whole drive) take most of the time.
| How you’ll use Linux | Suggested space |
|---|---|
| Trying it out, light browsing | 40–60 GB |
| Daily use, coding, everyday apps | 60–100 GB |
| Games (Steam), containers, large projects | 150 GB+ |
Not sure you have room? Check Settings > System > Storage in Windows first. You can’t shrink Windows below what it’s using, and Windows still needs comfortable headroom afterward.
The safety order (do these first, in this order)
Most dual-boot horror stories come from skipping one of these. Do them before you change anything on the disk.
1. Back up your files
Copy your documents, photos, and anything not already synced to the cloud onto an external drive. Partitioning is reliable, but a backup turns any mistake into an inconvenience instead of a loss.
2. Create Windows recovery media
Search the Start menu for Create a recovery drive, open it, insert the second USB drive, and follow the prompts. If Windows ever fails to start after you change boot settings, this drive gets you into repair tools. Label it and keep it separate from the Linux stick.
3. Save your BitLocker / Device Encryption recovery key (before changing anything)
Many Windows 11 PCs ship with encryption already on, and changing boot settings can make Windows ask for the 48-digit recovery key at startup.
- Find your key: sign in at aka.ms/myrecoverykey (your Microsoft account’s recovery-key page) on another device and confirm the key ID matches your PC. Print it or save it somewhere off this computer.
- Check whether encryption is on: search Start for Manage BitLocker (Pro editions) or go to Settings > Privacy & security > Device encryption (Home editions).
Important for Ubuntu’s guided install: Canonical’s documentation states that the “install alongside Windows” option can’t work on a BitLocker-encrypted drive, because the encrypted partition looks like random data to the installer. Turn BitLocker or Device Encryption off (not just “suspend”) and wait for decryption to finish, then restart once to confirm Windows is fine. You don’t need to do this if Linux is going on a separate, unencrypted drive (see Step 8). Canonical also notes that not every Windows edition lets you turn encryption back on afterward, so check before you rely on it.
4. Check that the PC uses UEFI and a GPT disk
Dual booting a modern Windows 11 PC assumes UEFI firmware and a GPT disk. Windows 11 PCs almost always qualify, but verify:
- UEFI: press Win + R, type
msinfo32, press Enter. In System Summary, BIOS Mode should say UEFI. - GPT: right-click Start > Disk Management. Right-click the disk label on the left (usually Disk 0), choose Properties, open the Volumes tab, and look at Partition style. It should say GUID Partition Table (GPT).
If either says Legacy or MBR, stop and research your specific situation first. Mixing boot modes is a common cause of failed dual boots.
5. Disable Fast Startup
Fast Startup makes Windows “shut down” into a hibernation-like state, which leaves the Windows partition locked and can confuse Linux.
- Open Control Panel (search for it in Start).
- Go to Hardware and Sound > Power Options.
- Click Choose what the power buttons do.
- Click Change settings that are currently unavailable.
- Uncheck Turn on fast startup (recommended).
- Click Save changes.
From now on, always fully shut down or restart Windows before booting Linux.
Step 1: Shrink the Windows partition (from inside Windows)
Why shrink from Windows rather than in the Linux installer? Windows owns its NTFS partition and knows where its system files sit. Its own Disk Management tool moves around them safely and refuses to shrink past files it can’t move. Third-party resizing of an NTFS volume works most of the time, but doing it from Windows is the lower-risk path.
- Right-click Start and select Disk Management.
- Right-click your Windows partition (usually C:, the largest NTFS partition) and choose Shrink Volume.
- Wait while Windows calculates the available space.
- In Enter the amount of space to shrink in MB, type the size for Linux. 1 GB = 1024 MB, so 80 GB =
81920.
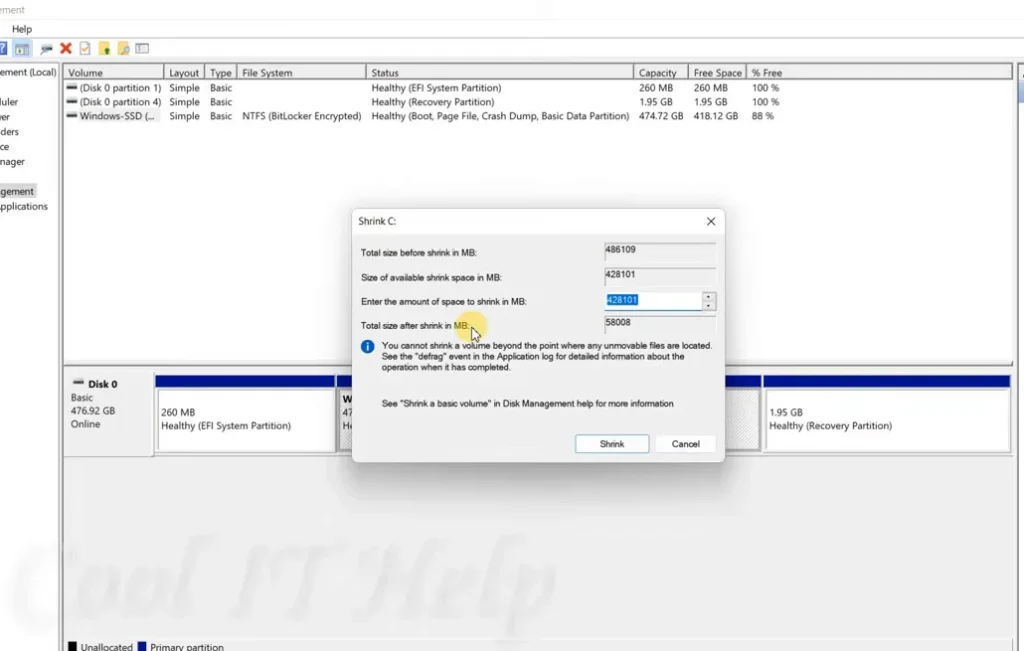
- Click Shrink.
You’ll now see a block labeled Unallocated. Leave it that way. Don’t create a new volume or format it; the Linux installer will use the empty space.
Windows won’t shrink as much as you asked? Files like the page file, hibernation file, and restore points can’t be moved. Freeing disk space, turning off hibernation, or deleting old restore points can help, but take any free space you can get and size Linux accordingly.
Step 2: Download Ubuntu, verify it, and make the bootable USB
Download the ISO from the official site
Get the image only from ubuntu.com/download/desktop (for Mint or Fedora, their official sites). Choose the current LTS release for the standard 64-bit Intel/AMD architecture unless you have an ARM PC.
Verify it with a checksum
A checksum is a long string that acts as a fingerprint for a file. The distro publishes the fingerprint of the real ISO; you calculate the fingerprint of the one you downloaded. If the two match exactly, the file arrived complete and unaltered. If even one character differs, delete it and download again.
On Windows, open PowerShell in your Downloads folder and run (replace the file name with yours):
Get-FileHash .\ubuntu-26.04-desktop-amd64.isoPowerShell uses SHA256 by default. Compare the result with the matching line in the SHA256SUMS file published on Ubuntu’s release page. Canonical’s “How to verify your Ubuntu download” tutorial also covers checking the file’s GPG signature if you want the stronger authenticity check.
Make the bootable USB
Writing an ISO is different from copying it; you need a tool. All of these erase the USB stick.
Option A: Rufus (Windows)
- Insert the USB stick and open Rufus.
- Under Device, select the stick. Double-check it’s not your backup drive.
- Click SELECT and choose the ISO.
- Set Partition scheme to GPT and Target system to UEFI (non CSM).
- Click START. If Rufus asks how to write the image, keep the recommended ISO image mode.

Option B: balenaEtcher (Windows, macOS, Linux) — the tool Canonical’s own tutorial uses. Choose the ISO, choose the USB drive, click Flash! There are no partition settings to get wrong.
Alternative: Ventoy. Ventoy turns a USB stick into a menu where you just copy ISO files onto it, which is handy if you want to try several distros. Note that booting Ventoy with Secure Boot on requires a one-time key enrollment the first time; follow Ventoy’s own documentation for that screen.
Step 3: Boot from the USB in UEFI mode
- Insert the USB stick and restart the PC.
- Press your PC’s boot menu key repeatedly as it powers on. It varies by brand and model; common ones include F12 (many Dell, Lenovo, and Acer models), Esc (HP opens a startup menu, then F9 for boot devices; also many ASUS), F8 (some ASUS), and F11 (many MSI). Check your manufacturer’s support page for your exact model.
- In the menu, choose the entry for your USB stick that mentions UEFI (for example, “UEFI: [your USB brand]”). If the stick appears twice, the non-UEFI entry is legacy mode; don’t use it.
Can’t catch the key? From Windows, go to Settings > System > Recovery, click Restart now next to Advanced startup, then choose Use a device and pick the USB drive.
Step 4: Try the live session before installing
When the Ubuntu installer starts, choose your language and settings, then pick Try Ubuntu instead of installing. This runs Ubuntu from the USB without touching your disk. Spend ten minutes checking:
- Wi-Fi: can you see and join your network?
- Sound: play a video in the browser; test headphones.
- Trackpad and keyboard: scrolling, clicking, function keys.
- Display and GPU: correct resolution, external monitor if you use one, no flickering.
- Bluetooth, webcam, sleep/brightness keys if they matter to you.
If Wi-Fi is missing, see the troubleshooting table; often it just needs drivers that the installer can fetch over Ethernet or USB phone tethering. If something essential is badly broken, this is the cheap moment to stop: you haven’t changed anything except shrinking Windows.
When you’re ready, open the Install Ubuntu shortcut on the desktop.
Step 5: Install Ubuntu alongside Windows
Work through the installer screens (language, accessibility, keyboard, network, interactive installation, app selection). On the screen offering third-party software, it’s worth checking both boxes for graphics/Wi-Fi drivers and media formats, especially on PCs with NVIDIA graphics.
You’ll then reach Type of installation. This is the screen that decides whether Windows survives.
The one option never to click for a dual boot: Erase disk and install Ubuntu. It deletes Windows and everything on the selected drive.
The automatic path: install alongside Windows Boot Manager
Select Install Ubuntu alongside Windows Boot Manager (the exact wording can vary slightly by release; it’s the option that names your existing Windows install).

The installer then shows the drive and a slider for how much space Ubuntu gets. It uses free space and avoids overwriting existing files. Check that the drive model and size are the disk you shrank, set the size, and continue. The installer creates an ext4 partition in the free space, adds its boot files to the existing EFI System Partition next to Windows, and sets up the GRUB boot menu.
Don’t see the alongside option? Stop; don’t fall back to “Erase disk.” The usual causes are BitLocker still on, Windows hibernated (Fast Startup), the USB booted in legacy mode, or Intel RST storage mode. All are covered in the troubleshooting table.
The manual path: Manual installation (formerly “Something else”)
Current Ubuntu calls this Manual installation (or manual partitioning); older Ubuntu releases and Linux Mint call it Something else. Use it if you want control, or if the automatic option misbehaves.
- Select the free space you created in Step 1. Don’t touch existing partitions.
- Create a partition in it formatted as ext4 with mount point / (root). The whole free space is fine; 40 GB+ if you also want a separate home.
- (Optional) Create a second ext4 partition with mount point /home for your personal files. This makes reinstalling Ubuntu later easier, but it isn’t required.
- Leave the existing EFI System Partition alone. Don’t format or delete it. Ubuntu needs it to be used as the EFI system partition, which the installer normally detects automatically.
- Make sure the boot loader is set to install on the same disk that holds that EFI System Partition (usually the only internal disk).
- You don’t need a swap partition; current Ubuntu uses a swap file automatically.
Fedora’s installer and Linux Mint’s look different, but the decisions are the same: use the free space, keep the existing EFI partition, and never pick the option that erases the whole disk.
Finish the remaining screens (account, time zone), review the summary carefully, click Install, and when prompted, restart and remove the USB stick.
Step 6: Keep Secure Boot on
You don’t need to disable Secure Boot for Ubuntu, Linux Mint, or Fedora. They boot through a small first-stage loader called shim, which is signed with a Microsoft certificate that your firmware already trusts. Shim then checks GRUB and the Linux kernel. Leaving Secure Boot on keeps Windows 11 happy, avoids triggering BitLocker recovery, and keeps a real security protection in place.
2026 note: Microsoft’s original 2011 certificate used to sign shim expired in June 2026. Current distributions ship shims signed with both the old and the new 2023 certificate, and systems that already boot keep booting. The practical takeaways: use a current ISO, and install firmware (BIOS/UEFI) updates from your PC maker when offered.
The one exception you might see: the blue MOK screen
Some drivers aren’t part of the signed kernel, and the most common example is proprietary NVIDIA drivers installed in certain ways. Secure Boot won’t load an unsigned driver, so Ubuntu signs it with a key it creates on your PC, called a Machine Owner Key (MOK). You approve that key once:
- During driver installation, you’re asked to create a short password. It’s single-use; write it down.
- On the next restart, a blue screen titled MOK management (or similar) appears before Ubuntu loads. It waits only a few seconds, so press a key when it appears.
- Choose Enroll MOK, then Continue, then Yes.
- Enter the password you created, then choose Reboot.
If you miss the screen or choose to continue booting, the driver simply won’t load (you’ll fall back to the open-source driver). Many current setups never show this screen because the drivers come pre-signed.
Step 7: First boot — boot order, updates, and the clock

After the restart, you should see the GRUB menu listing Ubuntu and Windows Boot Manager. Pick one with the arrow keys and press Enter. Ubuntu boots by default after a short countdown.
7.1 If the PC boots straight into Windows
This is the most common post-install surprise, and your Linux install is almost certainly fine. Your firmware simply still lists Windows Boot Manager first.
- Enter firmware setup. From Windows: Settings > System > Recovery > Advanced startup > Restart now, then Troubleshoot > Advanced options > UEFI Firmware Settings > Restart. Or press your PC’s setup key (often F2 or Del) at power-on.
- Find the boot order or boot priority section (the name varies by manufacturer).
- Move the ubuntu entry above Windows Boot Manager.
- Save and exit.
You’ll now get the GRUB menu every time, with Windows one arrow-key away.
7.2 Update everything
In Ubuntu, open Software Updater from the app grid, or press Ctrl + Alt + T to open Terminal and run:
sudo apt update
sudo apt upgrade
New to the terminal? Our guide to basic Linux commands explains what these do. Also check Additional Drivers (search for it in the app grid) for recommended GPU or Wi-Fi drivers. Boot into Windows and run Windows Update too.
7.3 Fix the clock that’s wrong by hours in one OS
Why does the time jump by several hours when you switch systems? Your PC has a hardware clock (the RTC) that keeps time while it’s off. Windows stores local time in it; Linux stores UTC and adds your time zone on top. When Ubuntu syncs and writes UTC, Windows reads that as local time and shows the wrong hour, and vice versa. In the US, that means an error of 4–8 hours depending on time zone and daylight saving.
The fix: tell Ubuntu to keep the hardware clock in local time, like Windows. In Ubuntu’s Terminal, run:
sudo timedatectl set-local-rtc 1 --adjust-system-clockThen confirm it took effect:
timedatectlThe output should include RTC in local TZ: yes. Ubuntu may print a warning that local-time RTC mode isn’t recommended; that’s expected, and it’s the standard choice for a Windows dual boot. Restart into Windows and check the time; if it’s off once, sync it in Settings > Time & language > Date & time > Sync now.
(The alternative is the reverse: making Windows treat the hardware clock as UTC with the RealTimeIsUniversal registry value. Use one method, not both.) More useful commands are in our Linux commands cheat sheet.
Step 8 (optional): The second-drive method
If your desktop or laptop has room for a second SSD, putting Linux on its own drive is the cleanest dual boot:
- Windows keeps its drive and its own EFI System Partition untouched; Linux gets the other drive with its own EFI partition. You can delete either OS later without affecting the other.
- No need to shrink Windows or turn off BitLocker on the Windows drive; Canonical notes BitLocker doesn’t block installing to a separate unencrypted drive.
- In the installer, choose the option that erases and installs on the new, empty drive only. Read the drive’s model and size twice before confirming; picking the wrong disk is the real risk here.
- Some users temporarily unplug the Windows drive during installation to make picking the wrong disk impossible. Afterward, choose which OS starts by default in firmware boot order, or pick per boot from the boot menu key.
Troubleshooting
| Problem | Likely cause | Fix |
|---|---|---|
| PC boots straight to Windows | Windows Boot Manager is first in firmware boot order | Move ubuntu above Windows Boot Manager in firmware settings (Step 7.1). Large Windows updates can occasionally reset this; recheck afterward. |
| No GRUB menu / Windows missing from it | Ubuntu didn’t detect Windows, or the menu is hidden | You can always reach Windows from the firmware boot menu. In Ubuntu, run sudo update-grub and check that the output mentions Windows Boot Manager. If the menu just flashes past, holding Shift (or tapping Esc) during startup shows it. |
| Windows asks for the BitLocker recovery key | Boot configuration changed, so the TPM no longer auto-unlocks | Enter the key from aka.ms/myrecoverykey. If it repeats every boot, make sure you aren’t toggling Secure Boot or boot mode, and that BitLocker is fully turned off if you’re still installing. |
| Clock wrong by hours in one OS | Windows uses local time for the RTC; Linux uses UTC | Run sudo timedatectl set-local-rtc 1 --adjust-system-clock in Ubuntu (Step 7.3). |
| Installer doesn’t see the disk, or offers no “alongside” option | BitLocker on, Fast Startup/hibernation, USB booted in legacy mode, or Intel RST | Turn BitLocker off, disable Fast Startup, reboot the USB’s UEFI entry. Some Intel laptops ship with storage in Intel RST (RAID) mode, which Ubuntu doesn’t support; the installer will show an alert linking to help.ubuntu.com/rst. Don’t just flip RST to AHCI in firmware: doing that without preparing Windows first can stop Windows from booting. Follow Ubuntu’s RST page or your manufacturer’s guide for your exact model. |
| Wi-Fi missing in the live session | Wi-Fi chip needs a driver not on the ISO | Connect by Ethernet or USB phone tethering, then check Additional Drivers after install; during install, tick the third-party drivers option. Test with a newer ISO if your laptop is very new. |
How to remove the dual boot later
Changed your mind? Do it in this order so the PC never ends up trying to load a GRUB that’s been deleted:
- Back up anything you want to keep from Ubuntu.
- Make Windows Boot Manager first in firmware boot order (Step 7.1, in reverse), and confirm Windows starts on its own.
- In Windows, open Disk Management. Identify the Ubuntu partitions: they have no drive letter and Windows can’t read their file system. Don’t touch the EFI System Partition or the Recovery partition. Right-click each Ubuntu partition and choose Delete Volume.
- Remove Ubuntu’s boot files from the EFI partition. Open Command Prompt as administrator and run:
“cmd“
mountvol S: /S
rd /s S:\EFI\ubuntu
mountvol S: /D
This temporarily gives the EFI partition the letter S:, deletes only the ubuntu folder, then removes the letter. Type the folder name carefully; never delete EFI\Microsoft. If your firmware lists a leftover “ubuntu” entry afterward, many firmware menus let you delete it, or it will simply fail over to Windows.
- Reclaim the space: right-click C: and choose Extend Volume. This works when the unallocated space sits directly after C:; if another partition is in between, Disk Management can’t extend into it.
- If you turned BitLocker off for the install, you can turn it back on now (if your edition supports it).
If Windows doesn’t start after this, boot the recovery drive you made earlier and use Startup Repair.
FAQ
Will setting up a dual boot delete Windows?
Not if you follow this order. Shrinking in Disk Management keeps your files, and choosing the “install alongside Windows Boot Manager” option (or the free space in manual installation) leaves Windows intact. The danger is choosing Erase disk, which is why backups come first.
How much space should I give Linux for a dual boot?
60–100 GB is a comfortable range for everyday use. Ubuntu needs 25 GB at minimum, but updates, apps, and your files fill a small partition fast. Gaming or development setups benefit from 150 GB or more.
Do I have to disable Secure Boot to dual boot Ubuntu?
No. Ubuntu, Linux Mint, and Fedora boot with Secure Boot on through a Microsoft-signed shim. The only extra step you might see is a one-time blue MOK enrollment screen for some drivers, such as NVIDIA’s.
Do I need to turn off BitLocker to dual boot?
For Ubuntu’s guided install on the same drive as Windows, yes: turn it off (not just suspend) and let decryption finish, after saving your recovery key. It isn’t required if Linux goes on a separate, unencrypted drive.
Why does my PC boot straight into Windows after installing Ubuntu?
Your firmware still lists Windows Boot Manager first. Move the ubuntu entry to the top of the boot order in UEFI firmware settings, and the GRUB menu appears at every start.
Why is the time wrong after switching between Windows and Linux?
Windows keeps the hardware clock in local time, while Linux keeps it in UTC. Run sudo timedatectl set-local-rtc 1 --adjust-system-clock in Ubuntu so both agree.
Should I install Windows or Linux first?
Windows first, then Linux. The Linux installer detects Windows and adds both to the GRUB menu; installing Windows afterward tends to take over the boot order.
Is dual booting safe for my PC?
Yes, dual booting doesn’t harm hardware, and done in the order above it rarely causes data loss. The risks are human: picking the wrong partition or skipping the backup. If you’d rather not partition at all, our dual boot explainer compares the alternatives.