
Quick answer: To secure a homelab network, start at the edge: change your router’s admin password, update its firmware, turn off UPnP and WPS, and delete port forwards you don’t need. Next, switch servers to SSH keys, set host firewalls to default-deny, and reach your lab through a VPN like WireGuard or Tailscale instead of open ports. Later, split devices into trusted, server, IoT, and guest networks, and keep tested 3-2-1 backups.
Securing a homelab doesn’t mean buying enterprise firewalls or reading a zero-trust textbook. Most of the real risk comes from a handful of fixable things: services left open to the internet, weak or reused passwords, unpatched devices, and no working backup. This guide puts those fixes in order, so you know exactly what to do today, this week, and later.
If you’re still building your setup, our homelab guide covers the hardware and software side. This page is about keeping it safe.
What actually threatens a homelab?
Before changing settings, it helps to know what you’re defending against. A plain-language threat model keeps you focused on what matters and stops you from worrying about movie-style hackers.
Automated internet scanners
The moment your home IP address is online, automated scanners probe it. They aren’t targeting you; they sweep the whole internet looking for open ports, login pages, and software with known vulnerabilities. If nothing answers, they move on. That’s why “expose as little as possible” is rule number one.
Exposed services and forgotten port forwards
A port forward you created two years ago for a game server, a NAS web interface opened “just for a weekend,” or a router that opened ports by itself through UPnP: these are the most common ways a homelab ends up reachable from the internet without the owner realizing it.
Weak, default, and reused passwords
Default router passwords, admin/admin on a camera, or the same password you used on a site that was breached. Attackers try these first because they work.
Ransomware
Ransomware encrypts your files and demands payment. Internet-exposed NAS devices have been targeted by named ransomware campaigns (DeadBolt and eCh0raix are two well-documented examples). Ransomware can also reach your NAS from an infected laptop on the same network through a mapped network drive. Good backups and snapshots turn this from a disaster into an annoyance.
Cheap or unsupported IoT devices
Smart plugs, cameras, and TV boxes often get few security updates and can be hard to audit. If one is compromised and it sits on the same flat network as your NAS, it becomes a foothold. Keeping IoT on its own network limits the damage.
What you probably don’t need to worry about (yet)
Targeted, nation-state-level attacks, hardware implants, and exotic Wi-Fi attacks are not realistic threats for most home networks. Focus on the basics; they block the attacks you’re actually likely to see.
Step zero: check what you’re exposing right now
You can’t secure what you can’t see. Spend 15 minutes answering one question: what on my network can someone on the internet reach?
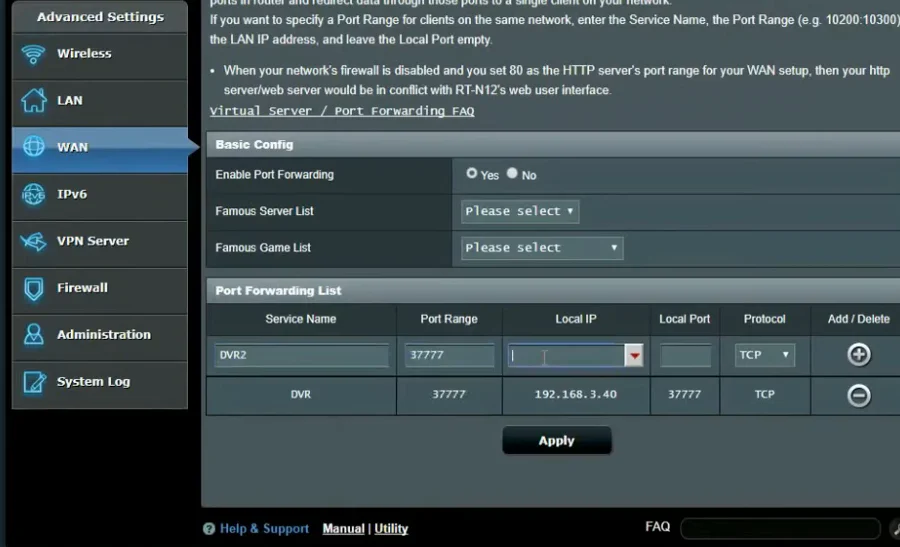
Read your router’s port-forwarding list
Log into your router’s admin page (often at 192.168.0.1 or 192.168.1.1, or through the vendor’s app). Look for a section called Port Forwarding, Virtual Servers, NAT, or Firewall rules. Write down every entry: the external port, the internal device, and why it exists. If you can’t remember why a rule exists, that’s a sign to remove it.
Check the UPnP table
Many routers show active UPnP mappings under UPnP, Advanced, or NAT. These are ports that devices (game consoles, media servers, some NAS apps) opened automatically. You may be surprised by what’s there.
Test from outside your network
Your router’s view isn’t the whole story, so test from the outside:
- Turn off Wi-Fi on your phone, use cellular data, and try to load your public IP address in a browser. Nothing should load.
- If you’re comfortable with command-line tools, scan your own public IP from a device on a different network (for example, a laptop tethered to your phone):
nmap -Pn YOUR_PUBLIC_IP. Only scan addresses you own. - Look up your public IP on Shodan, a search engine that indexes internet-facing devices. If it lists services on your address, they’ve been seen from the internet.
List what’s listening on each server
On each Linux server, see which services are listening and on which addresses:
sudo ss -tulpn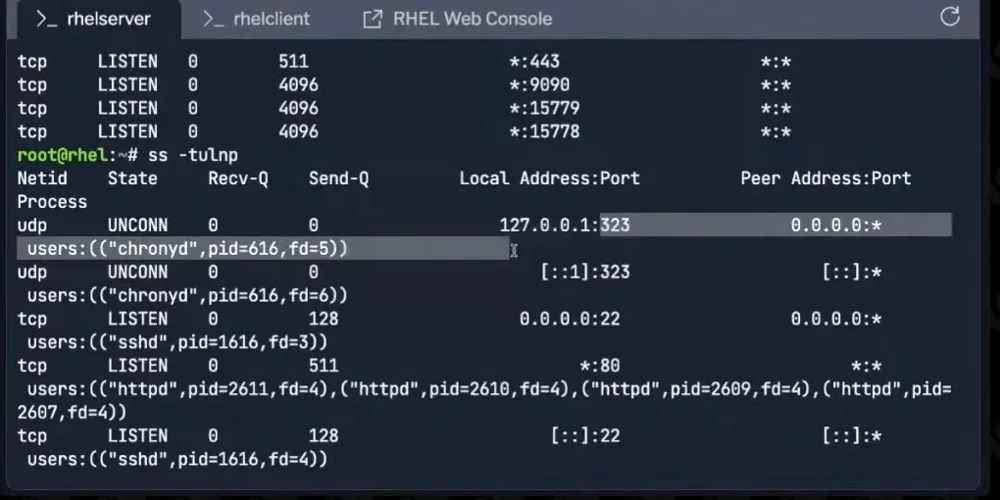
Services bound to 0.0.0.0 or [::] listen on every network interface. Services bound to 127.0.0.1 only accept connections from the machine itself. This doesn’t mean a service is reachable from the internet, but it tells you what a firewall needs to handle.
| Where to look | What it tells you | Good result |
|---|---|---|
| Router port-forward list | Ports you opened on purpose | Empty, or only a VPN port |
| Router UPnP table | Ports devices opened on their own | Empty (UPnP off) |
| Outside scan / Shodan | What the internet actually sees | Nothing, or only your VPN |
ss -tulpn on servers | What each machine listens on | Only services you recognize |
Do today: the quick wins
These steps take an evening, need no new hardware, and close the most common holes.
Lock down the router admin account
- Change the router’s admin password to a long, unique one stored in a password manager.
- Turn off remote management (sometimes called WAN-side admin or “access from internet”) unless you truly need it.
- If your router is managed through a vendor cloud account or app, turn on two-factor authentication for that account.
Update router firmware, and check if it’s still supported
Install the latest firmware and enable automatic updates if your router offers them. Then check the manufacturer’s site: if your model no longer gets security updates, plan to replace it. An end-of-life router is one of the weakest points on any home network.
Turn off UPnP
UPnP lets any device on your network open ports on your router without asking you. That’s convenient for game consoles and a risk for everything else. Turn it off. If a specific game or app breaks, add a single, documented port forward for that device instead, or better, use the VPN approach below.
Delete port forwards you don’t need
Go back to your list from step zero. Remove every port forward you can’t justify. Above all, don’t forward ports to NAS admin pages, SSH, RDP, Proxmox, or router logins. You’ll replace remote access with a VPN this week.
Use strong, unique passwords and turn on 2FA
- Use a password manager (Bitwarden, 1Password, or KeePassXC are common choices) and give every device and service its own password.
- Change every default password: cameras, printers, smart hubs, the NAS, and switch admin pages.
- Turn on two-factor authentication wherever it’s offered, especially for your NAS, your email, and any cloud accounts tied to your lab.
Turn on automatic updates
Most real-world compromises use known, already-patched bugs. Enable automatic updates on your NAS, router, and phones. On Debian or Ubuntu servers, install unattended security updates:
sudo apt install unattended-upgrades
sudo dpkg-reconfigure --priority=low unattended-upgrades
For containers, update images on a schedule you’ll actually stick to, and read release notes before updating anything critical.
Router and Wi-Fi basics
Your router is the front door, and Wi-Fi is the side door. Both deserve five minutes of attention.
Use WPA3, or WPA2 with a strong passphrase
Choose WPA3-Personal if all your devices support it. If older devices can’t connect, use WPA2/WPA3 transition mode or WPA2-Personal (AES). Avoid WEP, WPA (version 1), and TKIP entirely. Use a long passphrase; a few random words is easier to type and harder to guess than a short complex password.
Turn off WPS
Wi-Fi Protected Setup (the push-button or PIN pairing feature) has a history of weaknesses, especially the PIN method. You don’t need it. Turn it off and type the passphrase instead.
Set up a guest network
Almost every modern router can create a guest network. Turn it on, give it a different password, and enable client isolation or “allow guests to see each other / access local network: off” if your router has those options. Guests and their devices get internet, not your NAS. For many homes, the guest network is also the easiest first home for IoT devices (more on that below).
Pick a DNS approach
DNS translates names like thetechhow.com into IP addresses. Options, from simplest to most hands-on:
- Your ISP’s DNS: the default; it works, but offers no filtering.
- A filtering public resolver: Quad9 (
9.9.9.9) blocks known malicious domains; Cloudflare’s1.1.1.2blocks malware and1.1.1.3also blocks adult content, which is useful for households with kids. - A self-hosted resolver: Pi-hole or AdGuard Home on your lab blocks ads and trackers network-wide and lets you see which devices are contacting which domains. If you self-host DNS, keep a fallback so the household doesn’t lose internet when you reboot the server.
This week: harden servers and remote access
With the edge locked down, move inward to the machines themselves and how you reach them from outside.
Switch SSH to keys and disable password login
SSH keys are far harder to brute-force than passwords. Do this in order, and keep your current SSH session open until you’ve confirmed the new login works.
- On your laptop or desktop, create a key:
ssh-keygen -t ed25519 -C "you@your-laptop"- Copy it to the server:
ssh-copy-id youruser@server-ip- Open a new terminal and confirm you can log in without a password.
- On the server, create a small drop-in config file:
sudo nano /etc/ssh/sshd_config.d/10-hardening.confAdd:
PasswordAuthentication no
KbdInteractiveAuthentication no
PermitRootLogin no
Why a file starting with 10-? Current Debian, Ubuntu, and Fedora releases load every .conf file in /etc/ssh/sshd_config.d/ at the top of the main config, in name order, and SSH uses the first value it finds for each option. Some cloud images ship a file like 50-cloud-init.conf that turns password login back on; 10- is read first, so your setting sticks.
- Check the config for errors, then restart SSH:
sudo sshd -t
sudo systemctl restart ssh    # Debian/Ubuntu
# sudo systemctl restart sshd # Fedora/RHEL/Arch- Test from a new terminal again before closing your original session.
Changing the SSH port from 22 can reduce log noise, but it isn’t a security control on its own. Keys plus no internet exposure are what matter. For a cleaner way to manage keys and logins across many machines, see how to manage multiple devices in a homelab.
Set host firewalls to default-deny
A host firewall means each server only accepts the connections you allow, even from inside your network. On Ubuntu or Debian, ufw keeps this simple. Allow SSH before you enable the firewall, or you’ll cut off your own connection:
sudo ufw default deny incoming
sudo ufw default allow outgoing
sudo ufw allow from 192.168.1.0/24 to any port 22 proto tcp
sudo ufw enable
sudo ufw status verbose
Replace 192.168.1.0/24 with your own network range. Add other rules only for services you actually use, such as sudo ufw allow from 192.168.1.0/24 to any port 445 proto tcp for SMB file sharing. On Fedora or RHEL-based systems, firewalld does the same job.
Docker users, read this: ports published by Docker (-p 8080:80) are added straight to the system’s iptables rules and can bypass ufw. If a container should only be reached locally or through a reverse proxy, bind it to localhost, for example -p 127.0.0.1:8080:80, or restrict access at your router or VPN.
Replace port forwarding with a VPN
Remote access is where many homelabs get into trouble. Instead of forwarding ports to your services, connect to your network through a VPN and reach everything as if you were home.
- Mesh VPN (easiest): Tailscale, NetBird, or ZeroTier install on each device and connect them without any port forwarding. Tailscale also offers subnet routers, so one machine can give you access to the whole lab. If you prefer self-hosting the coordination server, Headscale (for Tailscale clients) and NetBird can be self-hosted.
- WireGuard (most control): run WireGuard on your router, firewall, or a server and forward one UDP port to it. WireGuard doesn’t respond to packets from unknown keys, so to a scanner the port looks closed. Router firmware such as OPNsense, pfSense, and OpenWrt support it, as do many consumer routers.
- Cloudflare Tunnel (for sharing web apps): creates an outbound-only connection, so no inbound ports are opened. But it does publish the app on the internet, so put Cloudflare Access or another login in front of anything private.
A good default: VPN for everything that’s just for you, a tunnel with authentication only for the rare service you share with others.
Move guests and IoT off your main network
You don’t need VLANs to get most of the benefit this week. Put smart TVs, plugs, cameras, and voice assistants on the guest network (or a dedicated IoT SSID if your router has one). They’ll still reach the internet and their apps, but not your NAS or servers. Some devices need to be on the same network as your phone for setup or casting; if that’s a problem, set them up first and then move them, or handle it properly with the VLAN plan below.
NAS hardening and ransomware protection
Your NAS usually holds the data you’d be most upset to lose, so it gets its own section. If you’re choosing or building one, our NAS server guide covers the options.
Keep the NAS off the internet
Never expose a NAS admin page directly through a port forward. Turn off vendor “remote access” or relay features you don’t use, and reach the NAS through your VPN instead. Disable services you don’t use (FTP, Telnet, old SMB1, UPnP/DLNA if you don’t stream to TVs).
Use least-privilege accounts and shares
- Use a separate, non-admin account for everyday file access; keep the admin account for administration only.
- Give each person, app, and backup job its own account with access to only the shares it needs.
- Make media libraries read-only for media server apps when they only need to read.
- Be careful with mapped network drives on everyday PCs: anything a logged-in laptop can write to, ransomware on that laptop can encrypt.
Turn on snapshots
Snapshots are point-in-time, read-only copies of your data. If ransomware or a bad script encrypts or deletes files, you roll back to yesterday’s snapshot. TrueNAS uses ZFS snapshots; Synology offers snapshots on Btrfs volumes; other platforms have their own equivalents. Schedule them automatically (for example, hourly for active shares and daily for archives) and keep enough history to notice a problem. Some platforms can also lock snapshots so they can’t be deleted for a set time; check your NAS documentation for whether yours supports it.
Snapshots live on the same hardware, so they are not a backup. A failed pool or a stolen NAS takes the snapshots with it.
Follow the 3-2-1 backup rule, and test restores
The 3-2-1 rule means:
- 3 copies of important data (the original plus two backups)
- on 2 different types of storage or devices
- with 1 copy off-site (cloud storage or a drive at a relative’s house or office)
Keep at least one backup that your everyday accounts can’t modify, such as a cloud bucket with versioning or an external drive you disconnect after each backup. Drive choice matters too; see our NAS drive guide for picking disks that suit always-on use.
Then test a restore. Pick a folder, restore it to a different location, and open the files. A backup you’ve never restored is a guess, not a plan. Repeat every few months.
Later: segment your network with VLANs
Once the basics are done, VLANs (virtual LANs) let you split one physical network into several separate ones, with a firewall deciding what can talk to what. It’s the step most guides make confusing, so here’s a simple version.
What you need
- A router or firewall that supports VLANs and inter-VLAN firewall rules. Common homelab choices include OPNsense, pfSense, OpenWrt, and prosumer lines such as UniFi or TP-Link Omada. Many ISP routers can’t do this.
- A managed (or “smart”) switch that supports 802.1Q VLAN tagging.
- Wi-Fi access points that can map different SSIDs to different VLANs.
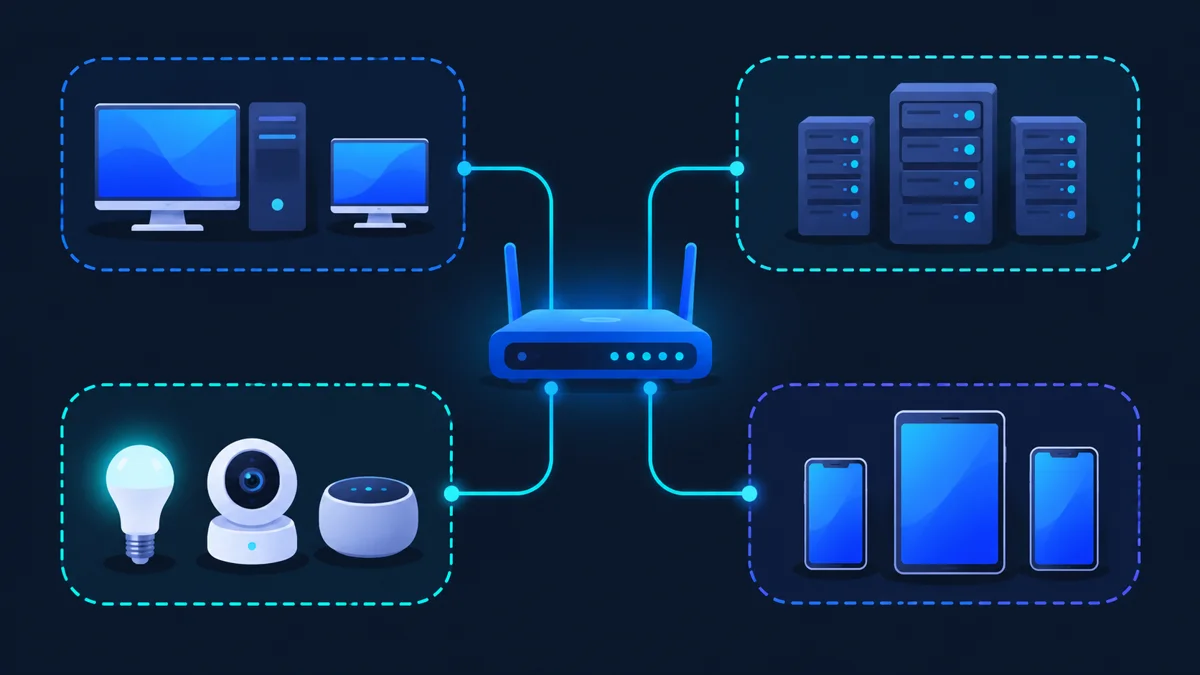
A simple four-network plan
| Network | VLAN ID | Example subnet | What lives here |
|---|---|---|---|
| Trusted | 10 | 192.168.10.0/24 | Your laptops and phones |
| Lab / Servers | 20 | 192.168.20.0/24 | NAS, Proxmox, Docker hosts, Pi-hole |
| IoT | 30 | 192.168.30.0/24 | Smart TVs, plugs, cameras, hubs |
| Guest | 40 | 192.168.40.0/24 | Visitors’ devices |
Keep a fifth, optional Management network for switch and access point admin pages if you want to go further, but four is plenty to start.
Firewall rules in plain English
Rules are read top to bottom. The pattern is simple: trusted devices can reach in, less-trusted devices can’t.
| From | To | Rule |
|---|---|---|
| Trusted | Lab / Servers | Allow (you manage your servers from here) |
| Trusted | IoT | Allow (so your phone can control smart devices) |
| Lab / Servers | Trusted | Block new connections (replies to your requests still work) |
| IoT | Trusted, Lab | Block (allow only specific exceptions, such as a camera sending video to your NVR on one port) |
| Guest | All local networks | Block; internet only |
| All networks | Your DNS server | Allow DNS (port 53) if you run Pi-hole or AdGuard Home |
| All networks | Internet | Allow (optionally restrict IoT devices that don’t need it) |
Two practical notes. First, “block new connections but allow replies” is what stateful firewalls like OPNsense and pfSense do by default for return traffic, so you only write the allow rule in one direction. Second, casting and device discovery (AirPlay, Chromecast, many smart-home apps) rely on mDNS, which doesn’t cross VLANs by default. Most VLAN-capable routers offer an mDNS repeater or reflector option to fix this.
Roll it out without breaking everything
- Create the new VLANs and firewall rules but leave your existing network untouched.
- Move the guest network first (lowest risk), then IoT, then servers.
- Keep your trusted devices on the network you manage from until everything else works.
- Write down each device’s new IP address. If you manage many machines, our guide to managing multiple devices in a homelab helps keep track.
Optional: intrusion detection and monitoring
Once segmentation is in place, monitoring tells you when something’s off:
- Suricata (built into OPNsense and available as a pfSense package) can alert on known-bad traffic.
- CrowdSec reads logs and blocks IPs that show abusive behavior.
- Uptime Kuma alerts you when a service goes down, which is often the first sign of trouble.
These are nice to have, not a substitute for the steps above.
How to avoid locking yourself out
Fear of lockout stops a lot of people from securing anything. A few habits remove most of the risk:
- Keep one session open while you change SSH or firewall settings, and test from a second one.
- Allow before you deny: add your SSH or admin rule before enabling a default-deny firewall.
- Know your console access: a keyboard and monitor, IPMI, or your hypervisor’s console (such as Proxmox’s) lets you fix a server even if the network is broken.
- Back up router and firewall configs before big changes. OPNsense, pfSense, and most routers can export a config file.
- Write down the router’s factory-reset procedure and keep your password manager’s recovery kit somewhere safe.
- Change one thing at a time, then test.
The one-page homelab security checklist
Print this or copy it into your notes and tick items off.
Step zero: know your exposure
- Listed every port forward on the router
- Checked the UPnP table
- Tested from outside (cellular, nmap from another network, or Shodan)
- Ran
ss -tulpnon each server
Do today
- New, unique router admin password; remote admin off
- Router firmware updated; model still supported
- UPnP off
- Unneeded port forwards deleted
- Password manager in use; all default passwords changed
- 2FA on NAS, email, and cloud accounts
- Automatic updates on for router, NAS, and servers
Router and Wi-Fi
- WPA3 (or WPA2-AES) with a long passphrase
- WPS off
- Guest network on, with client isolation
- DNS choice made (filtering resolver or Pi-hole/AdGuard Home with fallback)
This week
- SSH keys set up; password and root login disabled
- Host firewalls set to default-deny (Docker ports checked)
- Remote access through Tailscale, NetBird, ZeroTier, or WireGuard
- IoT and guests moved off the main network
NAS and ransomware
- NAS not exposed to the internet; unused services off
- Separate non-admin accounts; least-privilege shares
- Automatic snapshots scheduled
- 3-2-1 backups with one off-site, hard-to-modify copy
- Test restore completed
Later
- VLANs: trusted, lab/servers, IoT, guest
- Inter-VLAN firewall rules in place; mDNS repeater if needed
- Optional IDS and monitoring set up
- Router/firewall config backed up
Frequently asked questions
Do I need VLANs to secure a homelab?
No. Turning off UPnP, closing port forwards, using a VPN for remote access, and putting IoT on a guest network gives you most of the protection. VLANs add finer control once those basics are done.
Is port forwarding safe for a homelab?
Forwarding ports to web apps, NAS admin pages, SSH, or RDP is the riskiest common setup. The safer exception is a single UDP port for WireGuard, because it stays silent to anyone without a valid key. For everything else, use a mesh VPN or an authenticated tunnel.
Is Tailscale or WireGuard better for homelab remote access?
Tailscale (which uses WireGuard under the hood) is easier: no port forwarding and simple device management. Plain WireGuard gives you full control and no third-party coordination server, but you manage keys and one forwarded port yourself. Both are solid choices.
Should I change my SSH port from 22?
It reduces log noise from bots but doesn’t make SSH meaningfully safer. Key-only authentication and keeping SSH off the internet are what protect you.
How do I protect my NAS from ransomware?
Keep it off the internet, update it automatically, use least-privilege accounts, schedule snapshots, and keep a 3-2-1 backup with at least one copy your everyday accounts can’t change. Then test a restore.
Is my ISP router good enough for a homelab?
For the “today” and “this week” steps, usually yes, as long as it still gets firmware updates. For VLAN segmentation you’ll typically need a VLAN-capable router or firewall plus a managed switch.
How often should I review my homelab security?
A quick check every few months works well: review port forwards and the UPnP table, apply updates, confirm backups ran, and do a test restore.
Start with the next 30 minutes
You don’t have to do everything tonight. Log into your router, check the port-forward list and UPnP table, and turn off anything you don’t recognize. That one step closes the most common way homelabs get hit. Then work down the checklist at your own pace.
Building out the rest of your setup? Explore our homelab hub for hardware and software guides, or compare options in our NAS server guide before you put your most important files on one.